ScrollRect 探究
前言
Scroll Rect 也是常用 Unity UI 之一。当需要滚动显示大量内容时 Scroll Rect 组件就能实现滚动效果;若需要有滚动条类似的拖动滚动,Scroll Rect 配合 Scrollbar 就可以简单实现拖动滚动。
从一个问题说起
使用 Scroll Rect 时最典型的一个问题就是滚动嵌套,当 Scrll Rect 需要滚动的内容也是一个可滚动的 UI 元素,那么就有可能发生一些不愿看到的结果。
结合这个问题,下面将深入实现 Scroll Rect 内容滚动相关组件的源码,来剖析具体工作原理。
首先来看看 ScrollRect 组件。
回到 ScrollRect 类
ScrollRect 类继承自 UIBehaviour,因此它具有 Unity 完整的生命周期;同时还实现了很多接口,例如 ILayoutGroup 等,后面会依次分析每个实现接口的意义。下面首先来看看 ScrollRect 类中一些比较重要的成员变量。
ScrollRect 类的成员属性
| 属性 | 描述 |
|---|---|
m_Content |
需要被滚动的 Rect Transform 元素。 |
m_Horizontal |
开启水平方向滚动。 |
m_Vertical |
开启垂直方向滚动。 |
m_MovementType |
内容滚动方式,有 Unrestricted, Elastic 和 Clamped 三种方式。设置为 Unrestricted 模式表示滚动无限制,Elastic 和 Clamped 模式会将滚动限制在 Scroll Rect 内,设置为 Elastic 还会带有弹性效果,通过弹性系数 m_Elasticity 可以调整弹性。 |
m_Inertia |
是否开启拖拽释放后滚动的惯性效果,开启时可以设置 m_DecelerationRate 值来控制减速速率。 |
m_ScrollSensitivity |
外设拖动事件监测灵敏度。 |
m_Viewport |
滚动内容 Rect Transform 的父节点,通常带有 Mask 组件,Scroll Rect 的重要组成部分之一。 |
m_HorizontalScrollbar |
水平方向上的 Scrollbar(可选)。 |
m_VerticalScrollbar |
垂直方向上的 Scrollbar(可选)。 |
对于 Scrollbar 后面会详细介绍,这里当 Scroll Rect 中使用时,有两个属性可以在 ScrollRect 组件设置面板调整:
m_XXScrollbarVisibility代表 Scrollbar 的可见性,它有三种模式:Permanent - 永远显示 Scrollbar;
AutoHide - 当 Scroll Rect 不需要滚动(比如 Viewport 尺寸比 Content 的要大)时自动隐藏 Scrollbar,这种模式不会更新 Viewport 尺寸;
AutoHideAndExpandViewport - 当 Scroll Rect 不需要滚动(比如 Viewport 尺寸比 Content 的要大)时自动隐藏 Scrollbar,这种模式会更新 Viewport 尺寸,同时这种模式下 Scrollbar 以及 Viewport 的 RectTransform 的参数由 ScrollRect 自动计算。
m_XXScrollbarSpacing表示 Scrollbar 和 Viewport 之间的空间大小。
另外 ScrollRect 类中还有一个 ScrollRectEvent(UnityEvent) 类型的成员变量 m_OnValueChanged,通过它可以监听 Scroll Rect 滚动带来的位置更新。
ScrollRect 类实现了 IInitializePotentialDragHandler、IBeginDragHandler、IEndDragHandler、IDragHandler、IScrollHandler、ICanvasElement、ILayoutElement 和 ILayoutGroup 这些接口,下面就从这些接口着手分析其重要的方法。
Scroll Rect 的布局
ICanvasElement 接口和 Rebuild 方法
实现这个接口 Scroll Rect 能够接收到 Canvas 渲染更新时 Layout 重建的通知(具体是通过 CanvasUpdateRegistry 类的 PerformUpdate 方法来执行)以实现重新构建 Layout,ICanvasElement 接口中最重要的方法是 Rebuild,下面看看 ScrollRect 中对于这个方法的具体实现:
|
|
可以看出在 ScrollRect 类自身实现的 Rebuild 方法中仅仅会对 Layout 前(CanvasUpdate.Prelayout)以及 Layout 后(CanvasUpdate.PostLayout)的重建回调做处理。
对于 Layout 之前的通知仅仅是调用了自身类的 UpdateCachedData 方法,这个方法缓存了以后计算会用到的相关数据,比如水平滚动条所在的 RectTransform 成员变量 m_HorizontalScrollbarRect、在隐藏垂直方向 Scrollbar 后是否可以将 Viewport 在水平方向上展开控制变量 m_HSliderExpand 等,代码如下:
|
|
其中对于 m_HSliderExpand 和 mVSliderExpand 的计算比较重要,这两个变量只有在为 Scroll Rect 设置了对应的 Scrollbar 并且 Scrollbar 的可见模式为 AutoHideAndExpandViewport 以及 Viewport 和 Scrollbar 都是 Scroll Rect 子元素时才被设置为 true,后面的 Viewport 展开计算中会经常用到这两个变量。
对于收到 Layout 完成之后的通知,会依次调用下面几个方法来更新对应的数据:
- 首先调用
UpdateBounds方法更新当前 Viewport 以及 Content 的 Bounds。方法中比较重要的有两部分,第一部分是调用AdjustBounds方法保证 Content 的 Bounds 不小于 Viewport 的 Bounds,只有在这个前提下 Scroll Rect 才能正确的滚动;另一点就是在内容滚动方式是MovementType.Clamped时,调整 Content 的 Bounds 的中心点位置在合适的位置(比如保证其 bottom 不高于 Viewport 的 bottom),这样就能达到在MovementType.Clamped模式时 Content 滚动到 Viewport 边界就无法在滚动的要求。部分代码如下:
|
|
- 在收到 Layout 完成的通知调用
UpdateBounds方法之后,紧接着就是执行UpdateScrollbars方法初始化 Scrollbar,包括其 handle bar 的长度(Viewport size / Content size),以及 Scrollbar 的初始值(通过horizontalNormalizedPosition或verticalNormalizedPosition方法得到)。具体来看看horizontalNormalizedPosition方法代码:
|
|
可以看出当 Content Bounds 尺寸小于 Viewport Bounds 尺寸时,Scrollbar 的值为 1;否则相等时 Scrollbar 的值为 0;否则大于时会根据两个 Bounds 的 min 和 size 两个参数进行计算得到。
- 最后执行的是
UpdatePrevData方法,这个方法主要是在接下来要更新 ScrollRect 时缓存 ScrollRect 的一些数据,后面计算会用到。
看完了 ScrollRect 自身实现的 Rebuild 方法,是不是觉得有点懵? 收到 Layout 重新构建通知为什么只对 Layout 前(CanvasUpdate.Prelayout)以及 Layout 后(CanvasUpdate.PostLayout)的重建回调做处理,最重要的 Layout 过程(CanvasUpdate.Layout)回调不处理怎么进行布局了? 没错,ScrollRect 类自身实现的 Rebuild 方法确实并未直接处理 Layout 过程的回调,真正的布局是在 LayoutRebuilder 辅助类中完成的,下面看看详细分析。
我们知道通过 LayoutRebuilder 类来进行布局,首先需要将自身 RectTransdorm 注册到 LayoutRebuilder 中,然后 LayoutRebuilder 通过调用自身的 Initialize 方法内将目标 RectTransform 与自身实例绑定在一起,最后 LayoutRebuilder 会调用 CanvasUpdateRegistry 类的 TryRegisterCanvasElementForLayoutRebuild 方法将自身实例注册到 CanvasUpdateRegistry 类中(LayoutRebuilder 实现了 ICanvasElement 接口),这样 Canvas 渲染更新时发出 Layout 重建的通知时,LayoutRebuilder 类的 Rebuild 方法会被回调,这里面才会对其绑定的 RectTransform 做真正的布局操作。
所以 ScrollRect 通过 LayoutRebuilder 辅助类进行布局,首先要做的就是将自身注册到 LayoutRebuilder 中,代码如下:
|
|
这行代码直接或间接的在 ScrollRect 类中被多次调用,比如改变 Viewport、Scrollbar 等操作以及执行 OnEnable 等方法。
OnEnable 和 OnDisable 方法
ScrollRect 类继承自 UIBehaviour,所以这两个方法都是 Unity 生命周期回调方法。首先来看看 OnEnable,代码如下:
|
|
代码很简单,首先添加了 Scrollbar 位置改变时的回调,以便能够更新 Content 位置;然后向 CanvasUpdateRegistry 中注册了自身以能够收到 Layout 重建前和重建完成后的回调;最后调用了 SetDirty 方法注册自身或者父级 LayoutGroup 到 LayoutRebuilder 中,以便能够真正的布局当前 ScrollRect。
再来看看 OnDisable 方法,它所做的事情基本上和 OnEnable 相反,比如从 CanvasUpdateRegistry 中反注册自己,从 Scrollbar 位置改变时的执行事件中移除对自身的回调等等。
ILayoutElement 接口
ScrollRect 类实现 ILayoutElement 能够保证其所在的 UI 元素能够在 Auto Layout 系统下自动适配和布局,详见《Unity UI - 布局(一)》,因此 Scroll Rect 能够被 ILayoutController 控制布局。值得注意的一点是在实现的 ILayoutElement 接口方法中,对于 minWidth、preferredWidth 这些数值方法返回值都是 -1,因此在某些 ILayoutController 控制布局时若是单纯使用这些数值方法作为其对应的尺寸大小,特别需要注意可能会出现的一些问题。
ILayoutGroup 接口和 ScrollRect 类对其中的方法具体实现
ScrollRect 类同时还实现了 ILayoutGroup 接口,因此除了自身能够被 ILayoutController 控制布局,它还能控制子元素的布局;这里主要涉及到 SetLayoutHorizontal 和 SetLayoutVertical 方法。
SetLayoutHorizontal方法主要计算 Viewport 的尺寸大小以及位置、Viewport 和 Content 的 Bounds 数据等。
这个方法中的代码比较长,首先第一步判断 m_HSliderExpand 或 m_VSliderExpand 的计算值(由 UpdateCachedData 方法中计算,表示是否支持在水平或垂直方向上允许 Viewport 扩展增加 Scrollbar 部分的尺寸大小),如果为 true 那么首先就让 Viewport 尝试撑满父元素,然后来检测 Content 是否能够充满整个 Viewport,代码如下:
|
|
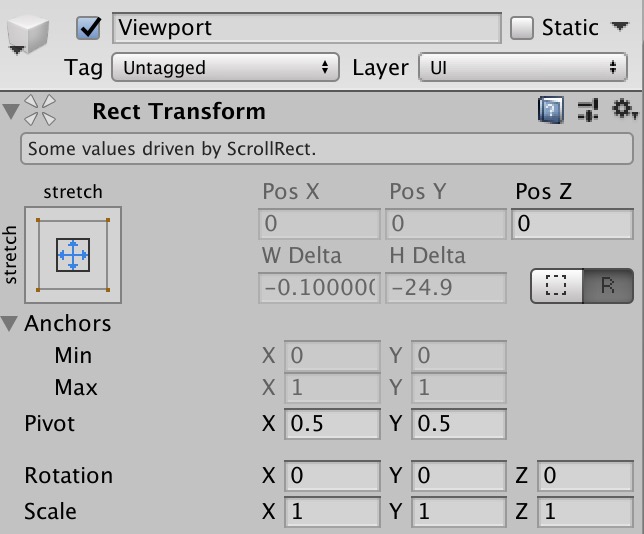
这种情况下 Viewport 相关在 Unity 编辑器面板会出现如下提示:

从上图可以看出这时候 Viewport 的位置以及尺寸大小是由父节点的 ScrollRect 计算的,不可以手动修改。
计算完 Viewport 的布局相关信息,就会调用 LayoutRebuilder 类的 ForceRebuildLayoutImmediate 方法重新计算 Content 的布局信息看它是否能在没有 Scrollbar 的情况下充满 Viewport。
第二步就根据上一步得到的信息以及操作,判断 Content 充满 Viewport 的情况,首先检测的是垂直方向,代码如下:
|
|
代码中,若垂直方向 Content 尺寸要比 Viewport 大(说明垂直方向需要滚动),那么会给垂直方向的 Scrollbar 预留空间并缩小 Viewport 水平方向的尺寸大小,紧接着再次调用 LayoutRebuilder 类的 ForceRebuildLayoutImmediate 方法重新计算 Content 的布局信息。
第三步和第二步类似,计算水平方向的 Scrollbar 是否需要预留空间以及 Viewport 在垂直方向上是否需要缩小。
最后一步再次检测垂直方向 Scrollbar 没有生效的情况,若未生效就给垂直方向的 Scrollbar 预留空间并缩小 Viewport 水平方向的尺寸大小,代码如下:
|
|
- 继续来分析
SetLayoutVertical方法,这个方法是紧接着SetLayoutHorizontal方法被调用的。通过上面的分析我们知道SetLayoutHorizontal方法已经计算好了 Viewport 的布局信息、Viewport 和 Content 的 Bounds 数据等,也确定了是否需要启用 Scrollbar;在SetLayoutVertical方法中,主要的工作就是更新 Scrollbar 布局,所以它里面的代码也很简单,最重要的就是调用 ScrollRect 类自身的UpdateScrollbarLayout方法,这里我们直接分析UpdateScrollbarLayout方法,其代码如下:
|
|
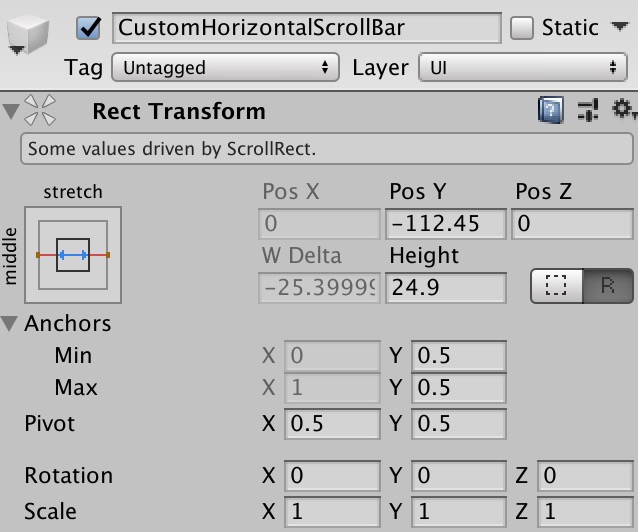
上部分的代码中,若垂直方向上 Viewport 是可以展开的且设置了水平方向的 Scrollbar,则布局水平方向 Scrollbar。将其 anchorMin.x 设置为 0(位于 Scroll Rect 最左边),anchorMax.x 设置为 1(位于 Scroll Rect 最右边),anchoredPosition.x 设置为 0(Scrollbar 支点的水平坐标位于 Scroll Rect 中间);若垂直方向需要 Scrollbar,则将水平方向的 Scrollbar 宽度设置为 Scroll Rect 宽度减去垂直方向滚动条需要的空间大小,否则直接将水平方向的 Scrollbar 宽度设置为 Scroll Rect 宽度。
计算设置垂直方向 Scrollbar 布局过程和上面类似,这两个过程 Scrollbar 的计算也是由 ScrollRect 控制,因此部分属性也不能在 Unity 编辑器中手动修改,如下图:

在 SetLayoutVertical 方法中计算设置完成 Scrollbar 布局后,还会更新一下 Viewport 和 Content 的 Bounds 信息。
Scroll Rect 如何滚动内容 - Event System 事件接口
前面看完了布局相关的接口方法,再来看看 ScrollRect 的滚动相关的分析,ScrollRect 类实现了一些列 Event System 中预定义的事件接口,下面就来一一来分析每个接口。
IInitializePotentialDragHandler 接口
实现这个接口,能够让 Event System 在分发「找到拖拽初始化对象」事件时,将自身所在 UI 元素作为事件待分发对象之一,如果确定该事件分发对象是自身,那么 ScrollRect 类中所实现的 OnInitializePotentialDrag 方法将会被回调。
ScrollRect 类对这个方法具体实现也很简单,仅简单地将拖拽速度变量 m_Velocity 初始化为 0。
IBeginDragHandler 接口
当拖拽对象开始发生拖拽时,实现的接口中的 OnBeginDrag 方法会被调用。ScrollRect 中 OnBeginDrag 方法部分代码如下:
|
|
从上面的代码中可以看出,它首先调用了 ScrollRect 类的 UpdateBounds 方法更新 Viewport 以及 Content 的 Bounds;紧接着初始化了 m_PointerStartLocalCursor 和 m_ContentStartPosition 相关变量,并将 m_Dragging 设置为 true。
IEndDragHandler 接口
当拖拽对象开始拖拽结束时,实现的这个接口中的 OnEndDrag 方法会被调用,对于 ScrollRect 中的这个方法仅仅将 m_Dragging 设置为了 false。
IDragHandler 接口
当拖拽对象发生拖拽时,实现的这个接口中的 OnDrag 方法会被调用,ScrollRect 中具体的 OnDrag 方法代码如下:
|
|
拖拽过程中,通过改变 Content 的位置从而实现了 Content 的滚动。下面来看看整个过程:
首先调用 RectTransformUtility 类的静态方法
ScreenPointToLocalPointInRectangle将当前屏幕上的坐标转换到 UI 元素的坐标系统下,并缓存至localCursor临时变量中;计算开始拖拽和当前拖拽回调发生的偏移量 pointerDelta,同时将这个偏移量累加到 Content 起始位置
m_ContentStartPosition中得到新的 position;将上一步得到的新的 position 减去此时 Content 的位置(此次更新前的位置)
anchoredPosition得到的值作为参数,调用 ScrollRect 类本身的CalculateOffset方法来计算这次拖拽回调 Content 的「补偿偏移」,其中计算「补偿偏移」大致代码如下:
|
|
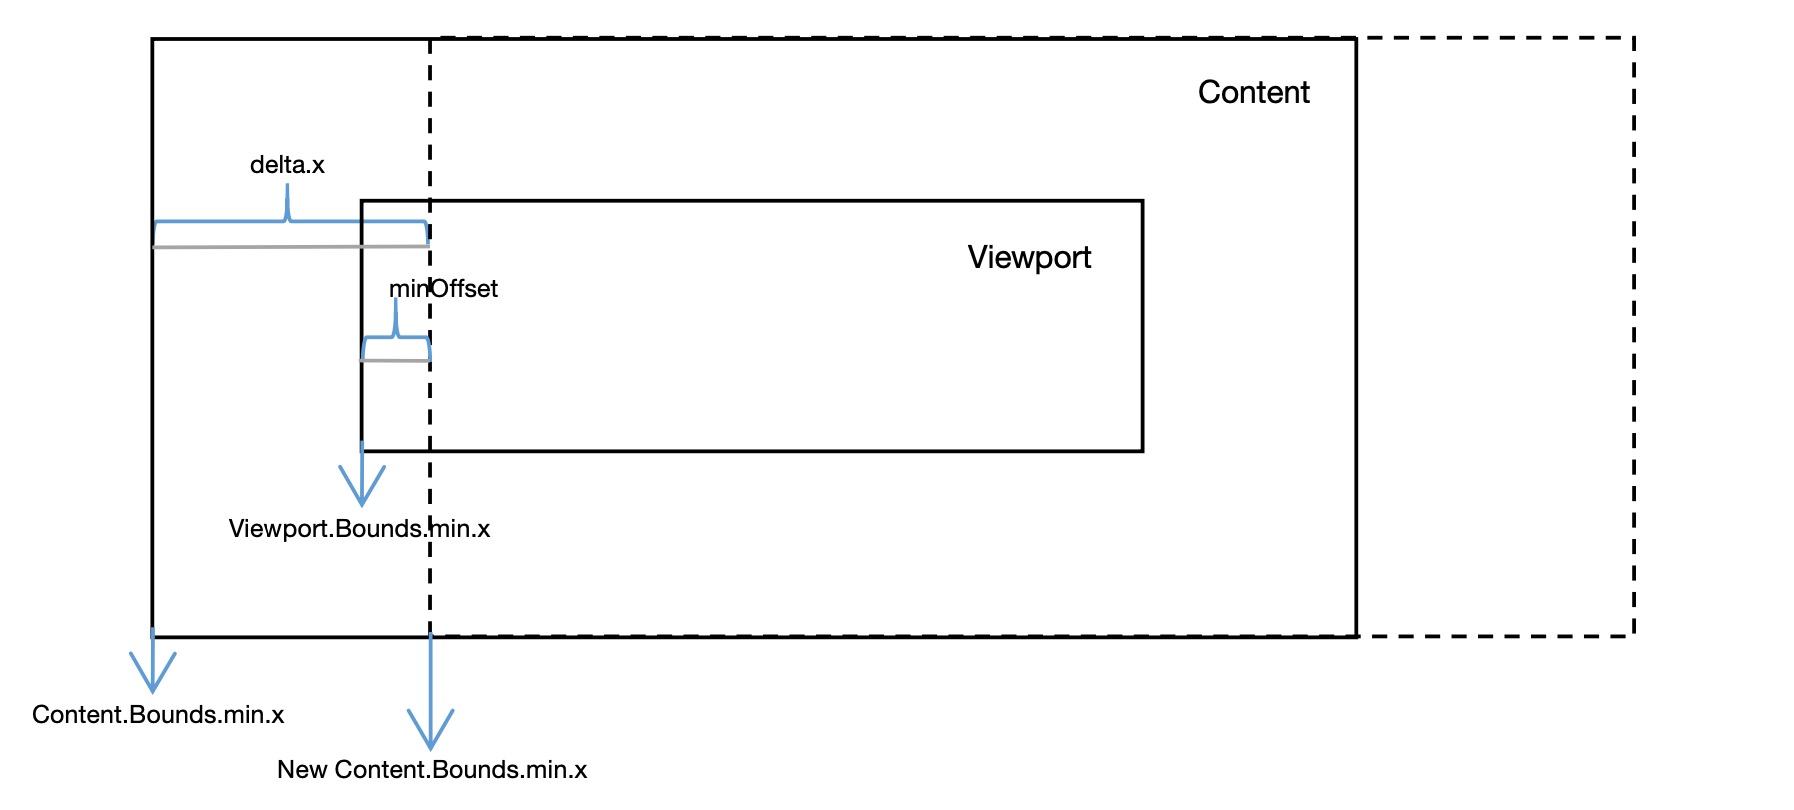
若当前 Scroll Rect 滚动模式为 Unrestricted 「补偿偏移」为 0,也就是说对于无限滚动模式 Content 的位置根据滚动的距离决定不需要任何补偿调整。若滚动模式是另外两种有限滚动模式(限制在 Viewport 内),则会为此次滚动距离计算「补偿偏移」,水平方向「补偿偏移」计算过程如下: 首先将 Content Bounds 水平方向上的最小值和最大值分别加上此次应该累加的偏移量得到临时的 min 和 max;然后用 Viewport Bounds 水平方向上的最小值和最大值分别与 min 和 max 相减,得到“假设”移动 Content 后 Viewport Bounds 和 Content Bounds 水平方向上的两个差值 minOffset 和 maxOffset;若最左边得到 min 差值小于 0,说明 Content 水平方向上左边界已经超过了 Viewport 的左边界,此时对于 Content 在水平方向上的移动就应该在上一步得到的位置 position 基础上加上这个 minOffset(这个值为负数,即减去这段 minOffset 的距离),来让 Content 水平方向上左边界不超过 Viewport 的左边界,对于又边界也是同样的计算过程。具体看下图会更清楚:

这就是计算水平方向上「补偿偏移」的过程,对于垂直方向也是类似的计算方式,得到「补偿偏移」后将这个偏移累加到第二步计算的位置上。
- 接下来就是对于滚动模式为
Elastic时的特殊处理,来实现拖拽过程中的弹性效果,代码如下:
|
|
主要就是调用了 ScrollRect 类方法 RubberDelta 对即将设置给 Content 的位置 position 进行了处理;RubberDelta 方法模拟了一条弹性曲线,使用「补偿偏移」offset 以及 Viewport Bounds 大小进行弹性位移的计算。
- 最后一步调用
SetContentAnchoredPosition方法为 Content 设置新位置 position。
IScrollHandler 接口
当鼠标滚轮滚动时,实现了这个接口中的 OnScroll 方法会被回调,ScrollRect 中具体的 OnScroll 方法代码如下:
|
|
上面计算过程也很简单,根据鼠标滚轮滚动的值来滚动 Content。
如果开启了垂直方向滚动且关闭了水平方向的滚动,那么使用滚轮较大方向上的那个值作为最终垂直方向滚动的差值,水平方向上的滚动差值设置为 0,然后使用差值乘以滚动灵敏度
m_ScrollSensitivity得到最终的滚动距离差值;如果滚动模式为
Clamped,也是首先计算「补偿偏移」使得 Content 边界不越界;这里和OnDrag方法中处理有点不同,仅仅在滚动模式为Clamped下加了这个保护而Elastic模式没有,原因在于在OnDrag方法中,虽然在Elastic模式也保证了 Content 边界不越界,但是后面会紧接着调用RubberDelta方法来模拟弹性效果,使得 Content 依旧会“假”越界,而在OnScroll方法中边界未做保护,就会导致滚轮滚动的距离实际就会设置为 Content 的距离,但是真正的弹性效果会在LateUpdate方法中实现(OnEndDrag以及OnScroll的回弹效果都会在LateUpdate方法中处理,后面会分析到)。最后调用
SetContentAnchoredPosition设置 Content 的新位置,并更新 Viewport 以及 Content 的 Bounds。
LateUpdate 方法
这个方法是 Unity 生命周期中的回调方法之一,在所有的 Update 方法执行完成之后该方法会被回调执行。ScrollRect 类重写了这个方法,主要用来做以下几件事情:
- 实现在滚轮滚动时 Content 边界越界时可能会有的弹性拉伸效果、Content 的弹性回弹效果以及拖拽结束后的惯性滚动效果,代码如下:
|
|
从上面的代码中可以看出,只有在 m_Dragging 为 false 时,这段代码才有可能被执行,也就是说只有当滚轮滚动操作时或者是拖拽结束后才有可能有滚轮滚动的弹性拉伸效果或回弹效果以及惯性结束停止滚动效果。
最开始调用 CalculateOffset 方法计算「补偿偏移」,注意这里传入的参数为 0,也就是仅用当前 Viewport 和 Content 的 Bounds 数据来计算而不需要累加偏移量。
如果滚动模式是 Elastic 且当前求得「补偿偏移」大于 0 时,那么计算弹性效果。首先来看看滚轮滚动使得 Content 到达边界处时,此时若滚轮继续处于滚动状态,那么会有弹性拉伸效果产生。通过之前的分析我们知道,滚轮滚动回调的 OnScroll 方法中,如果滚动模式为 Elastic 那么 Content 的位置是根据滚动计算得到的位移确定的(并未像 Clamped 模式一样做边界保护,有可能“越界”),当发生“越界”之后来到当前的代码中 Content 的位置有会被以弹性拉伸的方式来纠正,具体就是调用 Mathf 类的 SmoothDamp 方法传入当前速度 m_Velocity、动画时间 smoothTime 等参数尝试让 Content 以阻尼效果的方式回到边界处(若是正处于 Scrolling 状态,这里的时间动画 smoothTime 会在弹性系数 m_Elasticity 基础上扩大三倍),连续这样的过程就让滚轮滚动也能使 Content 产生了弹性拉伸的效果。再来看看拖拽结束或者是滚轮滚动结束让 Content 产生的回弹的情况,和刚刚说的滚轮拉伸效果一样,只不过这里的回弹动画时间 smoothTime 就是弹性系数 m_Elasticity。
滚动模式不是 Elastic 或者当前求得「补偿偏移」为 0 时,表示不需要弹性滚动,此时根据减速速率来计算停止滚动(带有惯性)。
否则如果既不需要弹性滚动也未设置惯性停止滚动,则将滚动速度 m_Velocity 设置为 0。
计算得到 Content 的新位置之后,接着对滚动模式为 Clamped 时限制了滚动边界,最后调用 SetContentAnchoredPosition 改变 Content 的位置。
- 拖拽过程中,如果设置了需要停止滚动后以惯性停止,则会更新滚动速度,代码如下:
|
|
- 最后在
LateUpdate方法中所做的就是更新 Scrollbar 相关信息,代码如下:
|
|
上面的代码中首先调用了 ScrollRect 类自身的 UpdateScrollbars 方法计算 Scrollbar 相关信息,看看这个方法的水平方向上计算代码(垂直方向也是同样的方式计算):
|
|
Scrollbar 的大小值由 Viewport Bounds 尺寸减去当前滚动的「补偿偏移」量除以 Content Bounds 尺寸,计算结果为在 0-1 之间,结果值越大 Scrollbar 尺寸越大(为 1 时会充满整个 Scrollbar 区域),因此在 Elastic 这种弹性“越界”模式下,当越界后若继续在某个方向上滚动随着「补偿偏移」越来越大,会看到 Scrollbar 在这个方向上的尺寸越来越小。
计算完 Scrollbar 的大小,紧接着调用 horizontalNormalizedPosition 方法计算 Scrollbar 的位置值,代码如下:
|
|
主要就是用 Viewport Bounds 的最小值和 Content Bounds 的最小值相减,除以 Content Bounds 尺寸和 Viewport Bounds 尺寸的差值得到最终 Scrollbar 的位置值。
执行完 UpdateScrollbars 方法,m_OnValueChanged 被执行来通知所有的观察者位置更新,接着调用 UpdatePrevData 更新缓存数据;最后调用 UpdateScrollbarVisibility 更新 Scrollbar 的显示。
到这里,整个 Scroll Rect 的滚动过程就分析完了,其滚动主要监听就是靠 Event System 中一些预制事件实时计算位置来实现。使用事件监听就会遇到令人头疼的问题,比如事件被拦截导致滚动失效,这也是本文最开始提到的一个问题,下面我们将来分析这个问题的发生过程以及解决方案。
回到最开始的问题 - 解决 Scroll Rect 中滚动嵌套出现的问题
在探讨这个问题之前,先了解 Event System 中事件分发的一些重要内容:
Event System 中,某个事件一旦被一个对象拦截消费将不会向祖先节点上冒泡传递;若这个事件对象无法消费成功,那么事件会依旧像上寻找能够消费它的对象。因此若 Scroll Rect 某个子元素消费了其滚动所需的事件(如 IDragHandler 等),那么将导致 Scroll Rect 无法滚动;但是若这个子元素消费了非 Scroll Rect 滚动所需事件(如 IPointerDownHandler 等),那么 Scroll Rect 依旧能够拦截滚动所需事件来实现滚动效果。
Unity UI 中检测事件接收对象主要靠 GraphicRaycaster 类完成,但它只识别 Graphic 作为检测对象,因此一个 ScrollRect 所在对象要想接收到滚动所需的预制事件,这个对象也必须绑定 Graphic 组件,或者其子节点有绑定 Graphic 组件但是子节点并未消费这些预制事件。
如果某个需求导致 Scroll Rect 滚动所需事件被子元素拦截并消费,Scroll Rect 如何才能继续保持接收这些事件来滚动了?有以下两中解决方案:
在子元素消费的特定事件中强制调用当前 ScrollRect 对应的响应事件方法,比如在子元素处理的
OnDrag方法中调用 ScrollRect 类的OnDrag方法,这样能够依旧保证 Scroll Rect 的滚动效果;第二种方式依然是在子元素消费的特定事件方法中处理,只不过这里不再强制调用 ScrollRect 对应的响应事件方法,因为这样显得代码太过于耦合,这种方法中在处理完子元素的逻辑后,手动进行一次 Event System 的事件分发对象检测操作,然后将事件再次分发下去。这种方法的代码大致如下:
|
|
上面的代码能够解决嵌套滚动问题,但是有个局限性就是鼠标位置移出其 Viewport,那么 RaycastAll 将检测不到任何可接收事件的对象,因此事件也将不能再继续传递。
如果 Content 很大很大,此时的鼠标明明还在其 Rect 内,为什么 Content 也无法再次被检测为事件接收对象?回答这个问题要从 Graphic.Raycast 说起,判断一个 Graphic 是否能够作为事件接收对象除了满足最基础的条件(Active 等属性设置)外,还有另一个重要条件就是调用 Graphic 自身的 Raycast 检测要合法,这个方法检测过程大致如下: 循环遍历这个 Graphic 所在对象以及其祖先节点对象,每一次遍历过程都需要满足其对象上绑定的所有的 ICanvasRaycastFilter 接口的 IsRaycastLocationValid 方法返回 true,这有所有的遍历成功返回 true,这个 Graphic 才能作为事件检测对象之一,详细分析见《Unity Raycasters 剖析》。
所以当鼠标移出 Scroll Rect 的 Viewport 时,就算鼠标还位于其子元素的范围内也无法在检测到这几个元素作为事件接收对象的原因也就水落石出了:
当判断 Content 元素时,对于其自身所有组件检测通过,但是当开始检测其父节点 Viewport 时,由于绑定了 Mask 组件,Maks 组件也是一个 ICanvasRaycastFilter,并且其具体
IsRaycastLocationValid方法直接将鼠标点是否位于自身 Rect 范围内作为返回值;上面的情况中鼠标已经移出了 Viewport,所以 Content 检测不能作为事件接收对象。Content 元素检测失败,对于 Viewport 元素自然直接返回失败,它甚至还没到达 Graphic Raycst 这一步就已经被淘汰(GraphicRaycaster 会提前过滤)。
对于 ScrollRect 所在对象,由于根本没有绑定 Graphic 组件,直接淘汰。
注意: 上面的检测中 Mask 组件具体 IsRaycastLocationValid 方法实现最终调用了 RectTransformUtility 类的 RectangleContainsScreenPoint 方法直接判断点是否在 Rect 内;而 Image 组件的具体 IsRaycastLocationValid 方法主要调用 RectTransformUtility 类的 ScreenPointToLocalPointInRectangle 来判断(文档),这个方法会判断当前 Image 的 RectTransform 所在整个平面能否被射线检测到碰撞,因此大部分情况是返回 true。
Scroll Rect 内容遮罩 - Mask 组件登场
Mask 组件除了能够限制拖动事件响应范围,另一个更大的作用就是遮罩显示 Content 的内容,更多关于这部分的内容读者可参考《Unity 遮罩“绘制”图》
Scrollbar 简单介绍
作为 Scroll Rect 可配置的一部分,Scrollbar 可以直接响应拖动从而来控制 Scroll Rect 内容的滚动。上面分析的时候也讲到了 Scrollbar 的 value 和 size 属性,除了这两个之外它还有很多其它属性,如 direction 控制 Scrollbar 的 value 增长方向等,更多请参考Unity Manual - Scrollbar。