一、介绍
单元测试是指对软件中的最小可测试单元进行检查和验证;通常而言,一个单元测试是用于判断某个特定条件(或者场景)下某个特定函数的行为。简单来说就是对代码进行测试以检查代码。
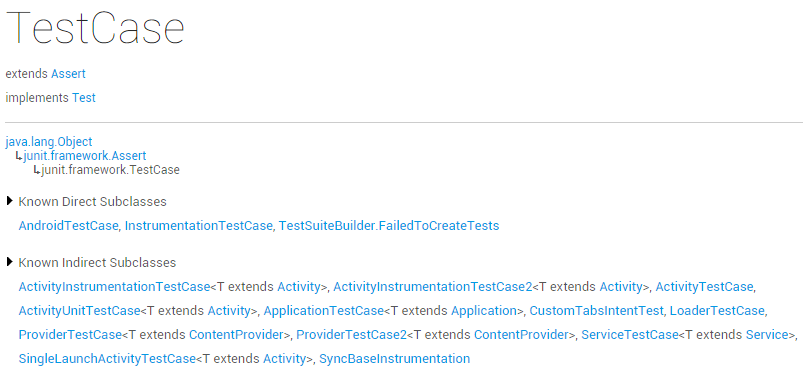
代码经常写,但是对于Android单元测试的代码,接触的比较少,所以就一步一步的来吧! https://developer.android.com/reference/junit/framework/TestCase.html ):
可以看到针对各种场景,Android提供了各种测试类以满足我们对Activity、Service、Application、ContentProvider等测试的需求。
二、简单方法单元测试
下面开始单元测试的码程(注意:本系列文章所有代码在Android Studio下进行编写与调试)!
在Android Studio下,编写单元测试用例非常简单。简单的对一个与Android环境无关的方法进行测试,代码如下:
新建测试类,继承自InstrumentationTestCase ,在该类中编写一个非常简单的方法用于测试(所有测试方法必须以test打头);
1
2
3
4
5
public class TestClass extends InstrumentationTestCase
public void testEqual ()
assertEquals(1 , 2 );
}
}
右键Run这个类,或者参考http://blog.csdn.net/harvic880925/article/details/38060361 进行简单配置也可运行。
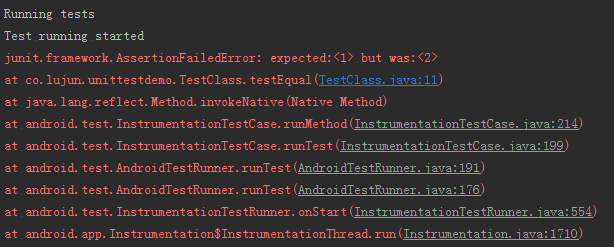
运行结果:
可以看到,运行出错并且打印出了错误。对一个简单的方法单元测试就这么简单,接下来,我们对Activity进行单元测试。
三、Activity单元测试
在Activity中,什么情况下应该对其进行测试? 1、Input validation,当然就是输入验证,比如EditText的输入;
2、Lifecycle events,生命周期中的一些测试,比如旋转屏幕后Activity被destroyed,这种情况下状态改变应该进行测试。
3、Intents,测试Activity能够正确处理为其配置可能需要处理的各种Intent,可以通过ActivityInstrumentationTestCase2发送模拟的Intent。
4、Runtime configuration changes,运行时的一些测试,比如屏幕旋转orientation改变,系统语言改变等等。
5、Screen sizes and resolutions,测试各种屏幕尺寸可能出现的问题。
有哪些测试Activity的类可以帮助我们快速的测试(注意:Activity中涉及UI的测试都需要在UI线程中进行)? 1、对Activity进行单元测试,当然要用到ActivityInstrumentationTestCase2(ActivityInstrumentationTestCase已deprecated)这个类,文档 是这样说明这个类的:This class provides functional testing of a single activity. The activity under test will be created using the system infrastructure (by calling InstrumentationTestCase.launchActivity()) and you will then be able to manipulate your Activity directly. 大概意思就是使用这个类进行测试能够直接的操作你的Activity,就是很方便。
看看代码,布局文件很简单,就是一个Button和一个TextView在LinearLayout中,这里不列出来,最后附源码中可查看。下面是被测试的Activity的代码:
1
2
3
4
5
6
7
8
9
10
11
12
13
14
15
16
17
18
19
20
21
22
public class MainActivity extends AppCompatActivity
Button button;
TextView textView;
@Override
protected void onCreate (Bundle savedInstanceState)
super .onCreate(savedInstanceState);
setContentView(R.layout.activity_main);
button = (Button) findViewById(R.id.btn_activity_test);
textView = (TextView) findViewById(R.id.tv_activity_test);
}
public TextView getTextView ()
return textView;
}
public Button getButton ()
return button;
}
}
用于测试的代码如下:
1
2
3
4
5
6
7
8
9
10
11
12
13
14
15
16
17
18
19
20
21
22
23
24
25
26
27
28
29
30
31
32
33
34
35
36
37
38
39
40
41
42
43
44
45
46
47
48
49
50
51
52
53
54
55
56
57
58
59
60
61
62
63
64
65
public class TestActivity extends ActivityInstrumentationTestCase2 <MainActivity >
private MainActivity mActivity;
private Instrumentation mInstrumentation;
public TestActivity ()
super (MainActivity.class);
}
@Override
protected void setUp () throws Exception
super .setUp();
setActivityInitialTouchMode(false );
mActivity = getActivity();
mInstrumentation = getInstrumentation();
}
@Override
protected void tearDown () throws Exception
mActivity.finish();
try {
super .tearDown();
}catch (Exception e){
e.printStackTrace();
}
}
public void testTextViewIsNull ()
assertNotNull(mActivity.getTextView());
}
public void testButtonIsNull ()
assertNotNull(mActivity.getButton());
}
public void testTextViewText ()
assertEquals("activity_test" , mActivity.getTextView().getText());
}
public void testButtonText ()
assertEquals("button" , mActivity.getButton().getText());
}
public void testButtonRequestFocus ()
* request focus for the Spinner, so that the test can send key events to it
* This request must be run on the UI thread. To do this, use the runOnUiThread method
* and pass it a Runnable that contains a call to requestFocus on the Spinner.
*/
mActivity.runOnUiThread(new Runnable() {
@Override
public void run ()
mActivity.getButton().requestFocus();
}
});
}
}
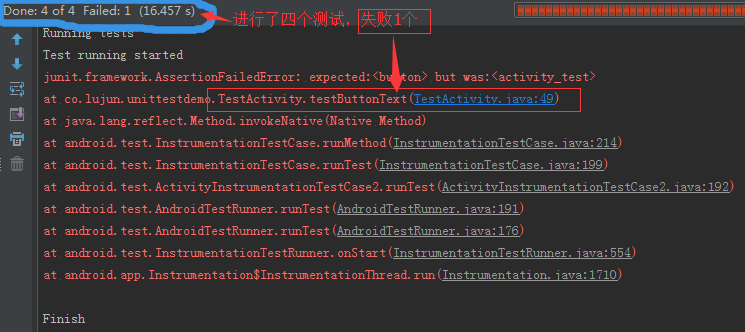
上面用于测试的代码中共编写了四个测试方法分别测试Activity中的TextView、Button是否为空以及TextView、Button中的内容与相应的字符串的相等比较。测试结果如下图:
测试结果显示共进行四次测试,失败了一个,并打印出了错误。
另外,Activity单元测试还有ActivityUnitTestCase 、SingleLaunchActivityTestCase 两个类。
2、ActivityUnitTestCase可以用于测试一个单一独立的Activity,在单元测试中,可以做一些与Android环境无关的方法的测试。但是,在这种方式下测试,不能像ActivityInstrumentationTestCase2一样给Activity发送Intent。
3、SingleLaunchActivityTestCase用于在不变的环境下测试一个单一的Activity,它只会调用一次setUp()和tearDown()方法。
四、Application单元测试
Android Studio生成项目的时候会自动生成一个ApplicationTest类用于测试此Moudle下的Application,该类继承自ApplicationTestCase,详细介绍参考文档 。
这里要说明的是createApplication()这个方法和tearDown()这两个方法;只有当调用createApplication()后test case才会调用Application的onCreate()方法,当测试完成以后,tearDown()被自动调用,tearDown()方法通过调用Application的onDestroy()方法stop & destroy你的Application。
代码编写同Activity单元测试代码一样,首先是Application代码:
1
2
3
4
5
6
7
8
9
10
11
12
13
14
15
16
17
public class MyApplication extends Application
private Object mObject;
@Override
public void onCreate ()
super .onCreate();
}
public Object getObject ()
return mObject;
}
public void setObject ()
mObject = new Object();
}
}
再就是用于测试上面MyApplication的测试代码:
1
2
3
4
5
6
7
8
9
10
11
12
13
14
15
16
17
18
19
20
21
22
23
24
25
26
27
28
29
30
31
32
public class ApplicationTest extends ApplicationTestCase <MyApplication >
private MyApplication mApplication;
public ApplicationTest ()
super (MyApplication.class);
}
@Override
protected void setUp () throws Exception
super .setUp();
createApplication();
mApplication = getApplication();
}
@Override
protected void tearDown () throws Exception
super .tearDown();
}
public void testObjectIsNull ()
assertNotNull(mApplication.getObject());
}
public void testObjectIsNull2 ()
mApplication.setObject();
assertNotNull(mApplication.getObject());
}
}
测试结果如下图:
如上图所示,四个测试中testApplicationTestCaseSetupProperly()和testAndroidTestCaseSetUpProperly()是默认的,另外两个是我们自己编写的测试方法。
1、testApplicationTestCaseSetupProperly() 测试了Application是否可以被正确的实例化;
2、测试代码中创建了非静态内部类并且其他地方有引用该类会造成内存泄露,testAndroidTestCaseSetUpProperly() 会清除掉所有类的变量从而避免上述问题。
源码:https://gitlab.com/lujun/UnitTestDemo
参考:


